Dynamic Dropdowns: Customizing Picklist Values Based on Select Properties in OmniScripts


Are you tired of static picklist values in your OmniScripts? Do you wish to dynamically populate dropdowns based on specific criteria or data? Look no further! In this blog post, we’ll explore how to create dynamic dropdowns using custom Apex code within OmniStudio’s OmniScripts.
Introduction to Dynamic Dropdowns
OmniScripts in OmniStudio provide a powerful way to create guided user experiences within Salesforce. One common requirement is to present users with dynamic dropdowns, where the available options change based on certain conditions or data retrieved from Salesforce.
Getting Started with Custom Apex Code
To implement dynamic dropdowns in OmniScripts, we leverage custom Apex code. Let’s dive into a step-by-step example to demonstrate how to achieve this.
Step 1: Create a New OmniScript
First, navigate to OmniStudio and create a new OmniScript. Within the OmniScript builder, add a Select Properties element to the canvas.

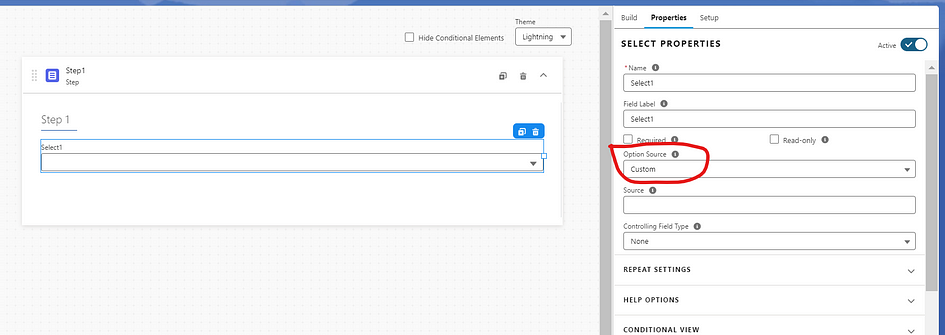
Step 2: Configure Select Properties Element
Drag and drop the Select Properties element onto the canvas. In the configuration panel, choose the “Custom” option.
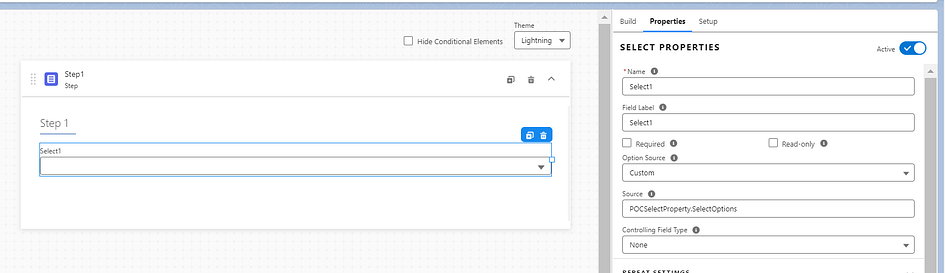
Step 3: Define Apex Class and Method
In the source field, specify the name of your Apex class and the method you want to call. For instance, POCSelectProperty.SelectOptions
Step 4: Implement Custom Apex Code
Now, let’s write the custom Apex code. Below is a sample Apex class (POCSelectProperty) that implements the VlocityOpenInterface and Callable interfaces:
global with sharing class POCSelectProperty implements YourPackageName.VlocityOpenInterface, Callable {
    public Object call(String action, Map<String, Object> args) {
        Map<String, Object> input = (Map<String, Object>)args.get('input');
        Map<String, Object> output = (Map<String, Object>)args.get('output');
        Map<String, Object> options = (Map<String, Object>)args.get('options');
        return invokeMethod(action, input, output, options);
    }

    public Boolean invokeMethod(String methodName, Map<String,Object> inputMap, Map<String,Object> outMap, Map<String,Object> options) {
        try {
            if (methodName.equals('SelectOptions')) {
                SelectOptions(inputMap, outMap, options);
            }
        } catch(Exception e) {
            System.debug(LoggingLevel.ERROR, 'Exception: ' + e.getMessage() + ' ' + e.getStackTraceString());
        }
        return true;
    }

    private List<Map<String, Object>> SelectOptions(Map<String, Object> inputMap, Map<String, Object> outMap, Map<String, Object> options) {
        List<Map<String, Object>> optionList = new List<Map<String, Object>>();
        for (Account acc : [Select Id, Name from Account]) {
            Map<String, Object> option = new Map<String, Object>();
            option.put('name', acc.Id);
            option.put('value', acc.Name);
            optionList.add(option);
        }
        outMap.put('options', optionList);
        return optionList;
    }
}
YourPackageName.VlocityOpenInterface YourPackageName is the omnistudio installed package name.
In this example, the SelectOptions method retrieves a list of Accounts from Salesforce and populates the dropdown options with their IDs and Names.
Step 5: Design OmniScript
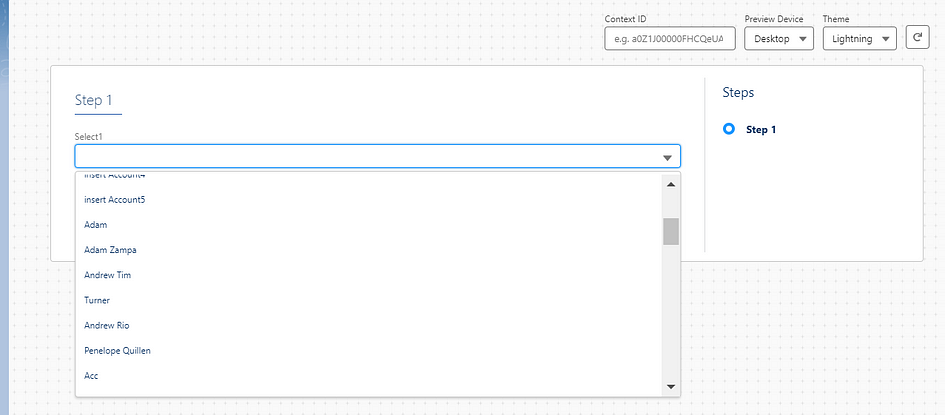
Finally, design your OmniScript layout and incorporate the dynamic dropdown wherever needed. The Select Properties element will now dynamically populate its options based on the logic defined in the Apex class.
Conclusion
By leveraging custom Apex code within OmniScripts, you can create dynamic dropdowns that adapt to your specific business requirements. This flexibility enhances user experience and streamlines data input processes within Salesforce.
Start implementing dynamic dropdowns in your OmniScripts today and unlock a new level of customization and interactivity!