Unlocking Seamless PDF Generation in Salesforce: A Visualforce Approach Without Apex Code
In Salesforce, generating PDF documents directly from object detail pages can streamline various business processes. In this detailed guide, I’ll walk through the steps to create a Visualforce page, link it to a custom button, and add the button to the object detail page to enable PDF generation on button click.
Step 1: Create a Visualforce Page
Navigate to Setup in Salesforce.
In the Quick Find box, type “Visualforce Pages” and select it.

3. Click on the “New” button.

4. Name your Visualforce page (e.g., “GeneratePDFPage”).
5. Paste the following code into the Visualforce page editor:

<apex:page standardController="POC_multiRecord__c" renderAs="pdf">
    <apex:pageBlock title="POC Multi-Record Details">
        <apex:pageBlockSection columns="1">
            <apex:pageBlockSectionItem>
                <apex:outputLabel value="Contact" for="contactField"/>
                <apex:outputPanel id="contactField">
                    <apex:outputField value="{!POC_multiRecord__c.Contact__c}"/>
                </apex:outputPanel>
            </apex:pageBlockSectionItem>
            <apex:pageBlockSectionItem>
                <apex:outputLabel value="Owner" for="ownerField"/>
                <apex:outputPanel id="ownerField">
                    <apex:outputField value="{!POC_multiRecord__c.Owner.Name}"/>
                </apex:outputPanel>
            </apex:pageBlockSectionItem>
            <apex:pageBlockSectionItem>
                <apex:outputLabel value="Created By" for="createdByField"/>
                <apex:outputPanel id="createdByField">
                    <apex:outputField value="{!POC_multiRecord__c.CreatedById}"/>
                </apex:outputPanel>
            </apex:pageBlockSectionItem>
        </apex:pageBlockSection>
    </apex:pageBlock>
</apex:page>
Ensure to replace “POC_multiRecord__c” with the API name of the object you want to generate information for.
Step 2: Save the Visualforce Page
Once you’ve pasted the code, click on the “Save” button to save the Visualforce page.
Step 3: Create Custom Button
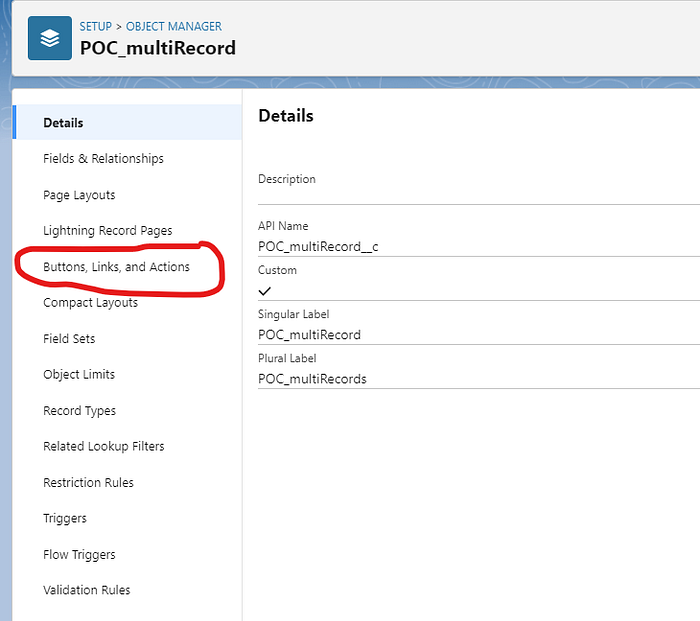
Go to Object Manager and search for your object
In the Left panel box, you’ll find “Buttons, Links, and Actions” — select it.

3. Click on the “New Button or Link” button.
4. Fill in the necessary details for your custom button (e.g., Label, Name).
5. For the Content Source, select “Visualforce Page” and choose the Visualforce page you created in Step 1.
6. Click “Save.”

Step 4: Add Button to Page Layout
Go to Setup.
In the Quick Find box, type “Object Manager” and select it.
Select the object (e.g., POC_multiRecord__c) for which you want to add the button.
Navigate to Page Layouts and select the appropriate layout.
Click on “Buttons” on the palette.
Drag and drop the newly created custom button to the desired location on the layout.
Save the layout.

Step 5: Test PDF Generation
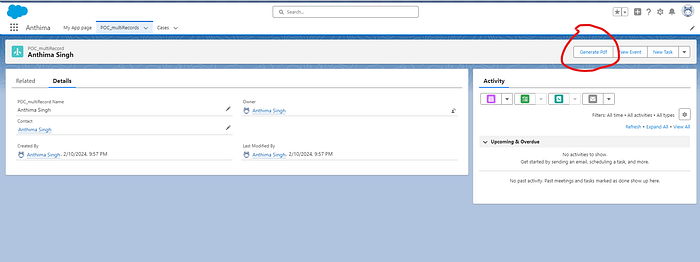
Navigate to a record detail page of the object (e.g., POC_multiRecord__c).
Click on the newly added custom button (“Generate PDF” or any name you provided).

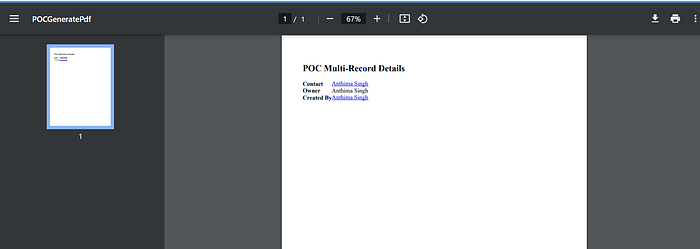
4. Salesforce will render the Visualforce page specified in Step 1 as a PDF document, containing detailed information about the record including Contact, Owner, and Created By details.

Conclusion
In this blog post, we’ve explored how to generate PDF documents of detailed record information in Salesforce using Visualforce pages without writing any Apex code. This approach provides a straightforward method for generating PDFs directly from record detail pages, offering flexibility and ease of use for various business requirements.
Feel free to customize the Visualforce page further to include additional fields or styling to meet your specific needs. Happy PDF generation in Salesforce!